

HC-SR04 Hardware Overview
At its core, the HC-SR04 Ultrasonic distance sensor includes ultrasonic transducers. The one acts as a transmitter which converts electric powered signal into 40 KHz ultrasonic sound pulses. The receiver listens for the transmitted pulses. If it gets them it produces an output pulse whose width can be used to determine the gap the heartbeat travelled. As simple as pie!
The sensor is small, clean to use in any robotics project and gives high-quality non-touch variety detection among 2 cm to 4 hundred cm (that’s approximately an inch to 13 ft) with an accuracy of 3mm. Since it operates on 5 volts, it may be hooked without delay to an Arduino or every different 5V logic microcontrollers.
Here are complete specs:

HC-SR04 Ultrasonic Sensor Pinout
Let’s check its Pinout.

- VCC is the power deliver for HC-SR04 Ultrasonic distance sensor which we be part of the 5V pin on the Arduino.
- Trig (Trigger) pin is used to cause the ultrasonic sound pulses.
- Echo pin produces a pulse whilst the pondered signal is received. The length of the coronary heart beat is proportional to the time it took for the transmitted sign to be detected.
- GND need to be related to the ground of Arduino.
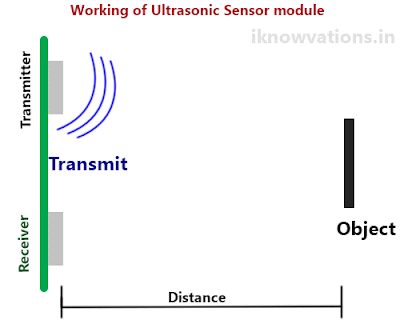
How Does HC-SR04 Ultrasonic Distance Sensor Work?
It all starts, whilst a pulse of at least 10 µS (10 microseconds) in duration is carried out to the Trigger pin. In response to that the sensor transmits a sonic burst of 8 pulses at forty KHz. This eight-pulse pattern makes the “ultrasonic signature” from the device specific, allowing the receiver to distinguish the transmitted sample from the ambient ultrasonic noise.
The 8 ultrasonic pulses travel via the air far from the transmitter. Meanwhile the Echo pin goes HIGH to begin forming the start of the echo-returned sign
n case, If those pulses aren't pondered lower back then the Echo sign will timeout after 38 mS (38 milliseconds) and go back low. Thus a 38 mS pulse suggests no obstruction inside the variety of the sensor.

If the ones pulses are reflected lower back the Echo pin is going low as quickly because the signal is received. This produces a pulse whose width varies between one hundred fifty µS to 25 mS, depending upon the time it took for the sign to be received.
Connecting HC-SR04 to Arduino Uno
Now that we've a entire understanding of ways HC-SR04 ultrasonic distance sensor works, we are able to begin hooking it up to our Arduino!
Connecting the HC-SR04 to the Arduino is pretty smooth. Start by means of setting the sensor on on your breadboard. Connect VCC pin to the 5V pin at the Arduino and join GND pin to the Ground pin at the Arduino.
When you’re carried out you must have some thing that looks just like the instance shown under.

So now that we’ve installed our ultrasonic distance sensor it’s time to jot down some code and take a look at it out.
#consist of "NewPing.H"
#outline TRIGGER_PIN nine
#define ECHO_PIN 10
#outline MAX_DISTANCE four hundred
NewPing sonar(TRIGGER_PIN, ECHO_PIN, MAX_DISTANCE);
float period, distance;
void setup()
Serial.Begin(9600);
void loop()
// Send ping, get distance in cm
distance = sonar.Ping_cm();
// Send results to Serial Monitor
Serial.Print("Distance = ");
if (distance >= four hundred distance <= 2)
Serial.Println("Out of range");
else
Serial.Print(distance);
Serial.Println(" cm");
delay(500);
No comments:
Post a Comment